Formative Task - Magic Eight Ball
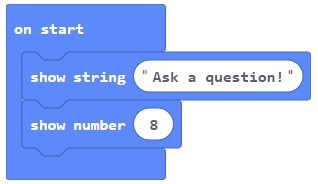
The Magic 8-ball is a fortune telling toy created by Mattel in the 1950s. The concept is simple. Ask the 8-ball a Yes or No question and the 8-ball will reply with answers such as “Yes”, “No”, “Without a doubt” etc. (seemingly being able to predict the future). Your task is to code your mirco:bit to display a random prediction when it is shaken. Step OneThe first step is to code the device to tell the user to ask a question. A string is to be displayed on the screen and this is achieved using the “show string” block found in the basic option of the block menu. Drag the “show string” block onto the workspace and place it within an “on start” block. Click on the text “hello!” and change it to “Ask a question!”
The next stage is to display the number “8” on the screen to represent the magic 8 ball logo. The steps are repeated again.
Step TwoNow the program displays “Ask a question” and “8”, the user needs to get a response from the micro:bit. This is achieved by using the “shake” gesture as an input. On the block menu choose the “input” option and select the “on shake” block and drag it onto the workspace. Once in the workspace the “on” block can be changed to a number of gestures, such as tilt left or right. For this project, the shake gesture is selected.
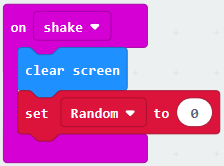
The display of the micro:bit needs to be updated first by using a “Clear” block. This will clear any pattern currently being displayed on the micro:bit whether it be the sentence “Ask a question” of the number “8”. The “clear screen” block is found in the “basic” option under the “More” option of the block menu. Drag the block on to the workspace and place within the “on shake” block.
Step ThreeNow the micro:bit has been programmed so it will respond to a shake gesture, the next step is to create a variable that a random number will be stored in. From the block menu select the “Variables” tab and click “Make a Variable”. A popup dialogue box will then ask you to name your variable. In this example name it “Random”
When the micro:bit is shaken we would like the random number to be generated and stored in the variable “Random”. To achieve this, add the “Set item to” block into the workspace.
Step FourNow that the variable is set to “0” when the micro:bit is shaken, we now need to assign a random number to it. From the block menu select the “Math” option and select “pick random 0 to 10”. Drag the “pick random” block onto the workspace and join to the “set random” block. A random number between 1 and 3 will give us the 3 options needed, so change the number “0” to “1” and “10” to “3”.
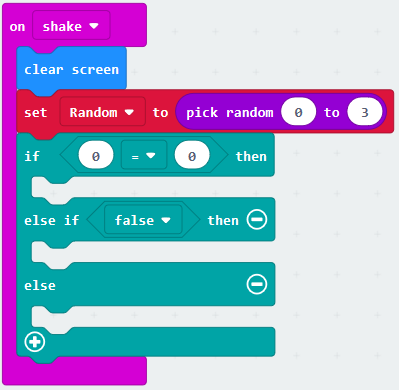
Step FiveThe next step is to add a selection process using the IF statement found within the “Logic” option within the block menu. Drag the “IF” block into the workspace and connect it to follow the “random” block. So if the micro:bit is shaken the screen is cleared, a random number is generated and stored in the variable “Random” - now we need to set what will happen for each of the different variable conditions.
As there are more than 2 conditions within this selection another selection statement is required, an “else if”. Click '+' on the if block to add extra else and else if statements. Next, we need to fill the IF statement to allow for selection. From the “logic” option on the block menu select the “equals” block.
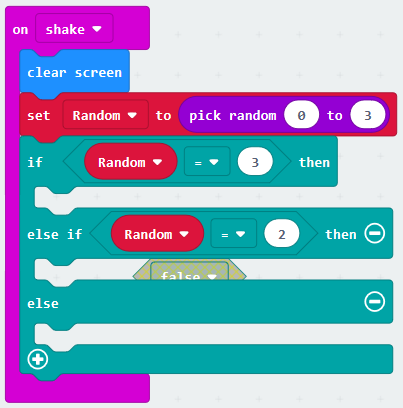
Step SixTo ensure the micro:bit bases the IF statement on the random number, the value stored in the variable “Random” needs to be checked. The “Random” variable can be found from the 'Variables' option in the block menu. The “Random” variable block is placed in the “equals” block to test the IF statement logic. If the “Random” variable is equal to "3" the first option is selected otherwise the second or third option is chosen.
So the micro:bit can switch between three options, click '+' in the 'if' block so that the block has 1 'if', 1 'else if', and 1 'else' statement. Your code should look like this:
Step SevenNow the micro:bit has 3 possible options based upon the random number generated, the next step is to give the user an answer to their question. This is achieved by selecting the “show string” block from the basic option of the block menu and dragging it onto the workspace. For each of the “then” parts of the “If” block, a “show string” block is required. Drag 3 from the menu or right click the block once in the workspace to duplicate. The strings should be modified for “YES”, “NO” and “I DON'T KNOW”. Once the answer has been generated the final part of the program is to code the micro:bit to display the number “8” again. Another "show string" block is needed and placed after the “If” statement.
|


